
This is the full documentation, which covers just about every step of my design, construction, and decisions. If you just want to look at the photo shoot and read an overview, click here for my previous post.
Description of the Garment:
Pluderhose are one of the distinctive garments in 16th century German clothing, and evolved from the hosen/strumpfhosen of earlier in the century presumably by adding more and more fabric in the lining layer. They appear to show up in the 1550s, and are only in style for a few decades. On the whole, they consist of a more or less straight-legged set of panes which come to anywhere from mid calf to the knee, with the hosen shortening as the decades moved on. Unlike the round or trunk hosen of other countries, they are fitted to the hips and mostly drape, rather than sticking out.Much like other styles of upper class clothing of the period, they were a form of conspicuous consumption--using large quantities of expensive fabrics, and quite possibly pinking (cutting small holes) them as well. Beyond that...they are another example of evolution from hosen--just leg coverings, because while trousers aren't required for some cultures, they kinda are once the hem of you upper garment rises above the lower thigh.
 |
| Photograph copyright Travis Abe-Thomas |
My Goals:
So. Overall premise of the project was fairly simple; I wanted pluderhose, I wanted them to be somewhat "extra", and I wanted them to be functional both on the rapier field and for late night bardics. This meant a few things:- They needed to be in durable and less than flammable materials.
- Must be easy to use the restroom in--while they would still tie closed, I wanted larger points and fewer of them.
- No stockings required, so that I would not have to fight with those not staying up late at night. This means that they needed to be long enough to wear with normal socks if desired.
- They must meet SCA rapier requirements to prevent a blade from slipping into openings. Meeting this requirement necessitated some anachronisms.
- Pockets. Enough said there.

Although, I would suggest the addition of a bright red hat if wearing during deer season.
Sources:
I had to document a few things in particular for this garment; the length of the pluderhose, and the wearing of long pluderhose with a close fitting doublet (rather than one which had hugely poofy sleeves)--this was my preference for simplicity and the amount of fabric I had on hand for the doublet. Separately, I wanted to document the use of different pinking patterns on each leg, although that was really optional--I didn't have to use different patterns, of course. The last was firmly documenting the odd seaming of the butt of the pluderhose--while my pattern is based on extant examples which have it, I wanted a pictorial example as well. |
| A Standard Bearer. British Museum, #1952,0405.225 |
 |
| The Butcher and His Servant, J Amman. |
 |
| Jost Amman. Getty Museum, Object #89.GA.15 |
At some point in the future, I also intend to make a cape and hat based on this woodcut in order to round out the outfit. This style of tall, rounded hat with narrow brim is apparently referenced to as a "Saxon hat" [FBoF, pp 211].
 |
| Sture Suits in the Uppsala Cathedral Museum |
Materials:
As in a few details of the construction for practicality, I made one or two decisions on the materials which are difficult to document. From inside of the garment to the outside:The base shorts were sewn and pieced of deerskin splits from Uncle George's Discount Leather...I do not particularly recommend the product, btw. What he doesn't say is that these are the off side of the split, so the leather varies from tissue thin (and holey) to 5+oz. Thankfully, they /were/ cheap and I purchased enough of them (with the thought of deerskin breeches as well) that I could easily piece the shorts. This type of leather is probably the closest (and easily available) to what is used in the extant garments--a heavy, suede finished leather, possibly deerskin or heavy chamois [PoF3, pp. 62, 66]. This material was chosen because I wanted to get as close to the period option as possible. The leather is also surprisingly soft and comfortable.
The next layer out--the poofy lining--is a hand-dyed silk canvas, which I had intended to use in my Hasting's Suit...but did a poor job getting the green even in the end. The unevenness wasn't acceptable for a court suit where it is the outer layer, but I figured that using it for a lining layer like this would be perfectly fine, and would let me get a good use out of it. Especially as it is intended as a more "practical" garment...the slight unevenness helps me blend into the trees (really!). The silk canvas is one which I purchased from Fashion Fabrics Club several years ago; while the site is very much buyer beware, sometimes you get lucky. As in this case, with some of the heaviest and tightest woven 100% silk (fully passed a bleach test) I've gotten my grubby mitts on. While silk canvas does not appear to have been a thing, the poof layer of pluderhose did often appear to be silk, and often backed with a linen to increase stiffness.

This thorn {?} was stiffened with bone, cost me 12fl even without the armor. Otherwise my clothes were as shown below, leather hose with half silk.It appears the "half silk" refers to when hosen had the outer or primary fabric of some other fabric, and unspecified silk as the decoration.
The leather I used was also from Uncle George's Leather Shop, and was labeled as both deer-tanned cowhide, or re-tanned veg-tan--I bought four half hides of the stuff, in two shipments, and thinking they were different items. Imagine my surprise when I found they weren't--it turned out fine, because I have a use for two full hides of leather, but still...accurate descriptions in sales is important. I also have some good deer tan cowhide from Tandy leather--it is quite a bit softer (deliciously so!) and better draping than this stuff.
And lastly, thread. I used linen thread throughout, in a variety of sizes and colours. Black linen thread for finer stitching on the silk as well as tunnel stitching on the leather, the leather was sewn with 16/2 linen in a close of a brown as I could find, and the deerskin was sewn with a variety of white linen threads. Exactly which size of thread depended on the seam, as well as the exact thickness of the leather in question. And whether I felt like fighting the fine thread that sewing session.
Other bits used which could come under the notions category is the heavy use of beeswax and coad (a heat activated resin) to wax my threads for durability and to make them behave.
 |
| Photograph copyright Travis Abe-Thomas |
Pattern:
The pattern was problematic. I started this project on February 7th, 2018...and ran into issues right away. My plan had been to use my original method for pattern drafting. I drafted it out, and found I couldn't move in the slightest. They didn't work, and the primary issue was the width of the rise. In the end, I believe I went through at least four versions of the base shorts before arriving on one which worked. Thankfully, I was taking notes throughout, and in the end, published an updated version of my base shorts drafting method, which can be found here.


The number of panes was determined by what I find pleasing to the eye--you see examples of any number from 4-7. I believe there was also some finagling due to inconsistencies in the leather.

Seams:
I kept it simple--the majority of seams in the leather were done in a double running stitch, or a saddle stitch. The two seams end up looking more or less the same, but on a double running (or Holbein stitch) stitch you go over the same seam twice, and saddle stitch is worked with a needle on either end of the thread. Overcast or whip stitches were also used, as was a tunneling version.Construction:


The other leg received pinking cuts at 45* across the pane edge, to give a slightly feathered appearance with wear.


After much self debate, I decided to use a heavy linen in this russet-brown; it is justscrap fabric which I had laying around--I have a fair amount of the stuff, and this exact one was chosen because I had enough at hand and it compliments the green. I had considered using more of the deerskin, but at that point was fed up with working the stuff, plus I felt it could stick to said wine bottles and make them hard to extract.
The pocket construction is based on those in the Sir Richard Cotton suit, as detailed on page 77 of 17th-Century Men's Dress Patterns. This is not the first step.

As detailed, the pocket openings are bound in narrow strips of silk--just a simple binding, nothing fancy. This strip happens to be far too narrow, and gave me trouble.


In the end, I had to run the gathering stitches per pane and be quite careful in drawing them up.

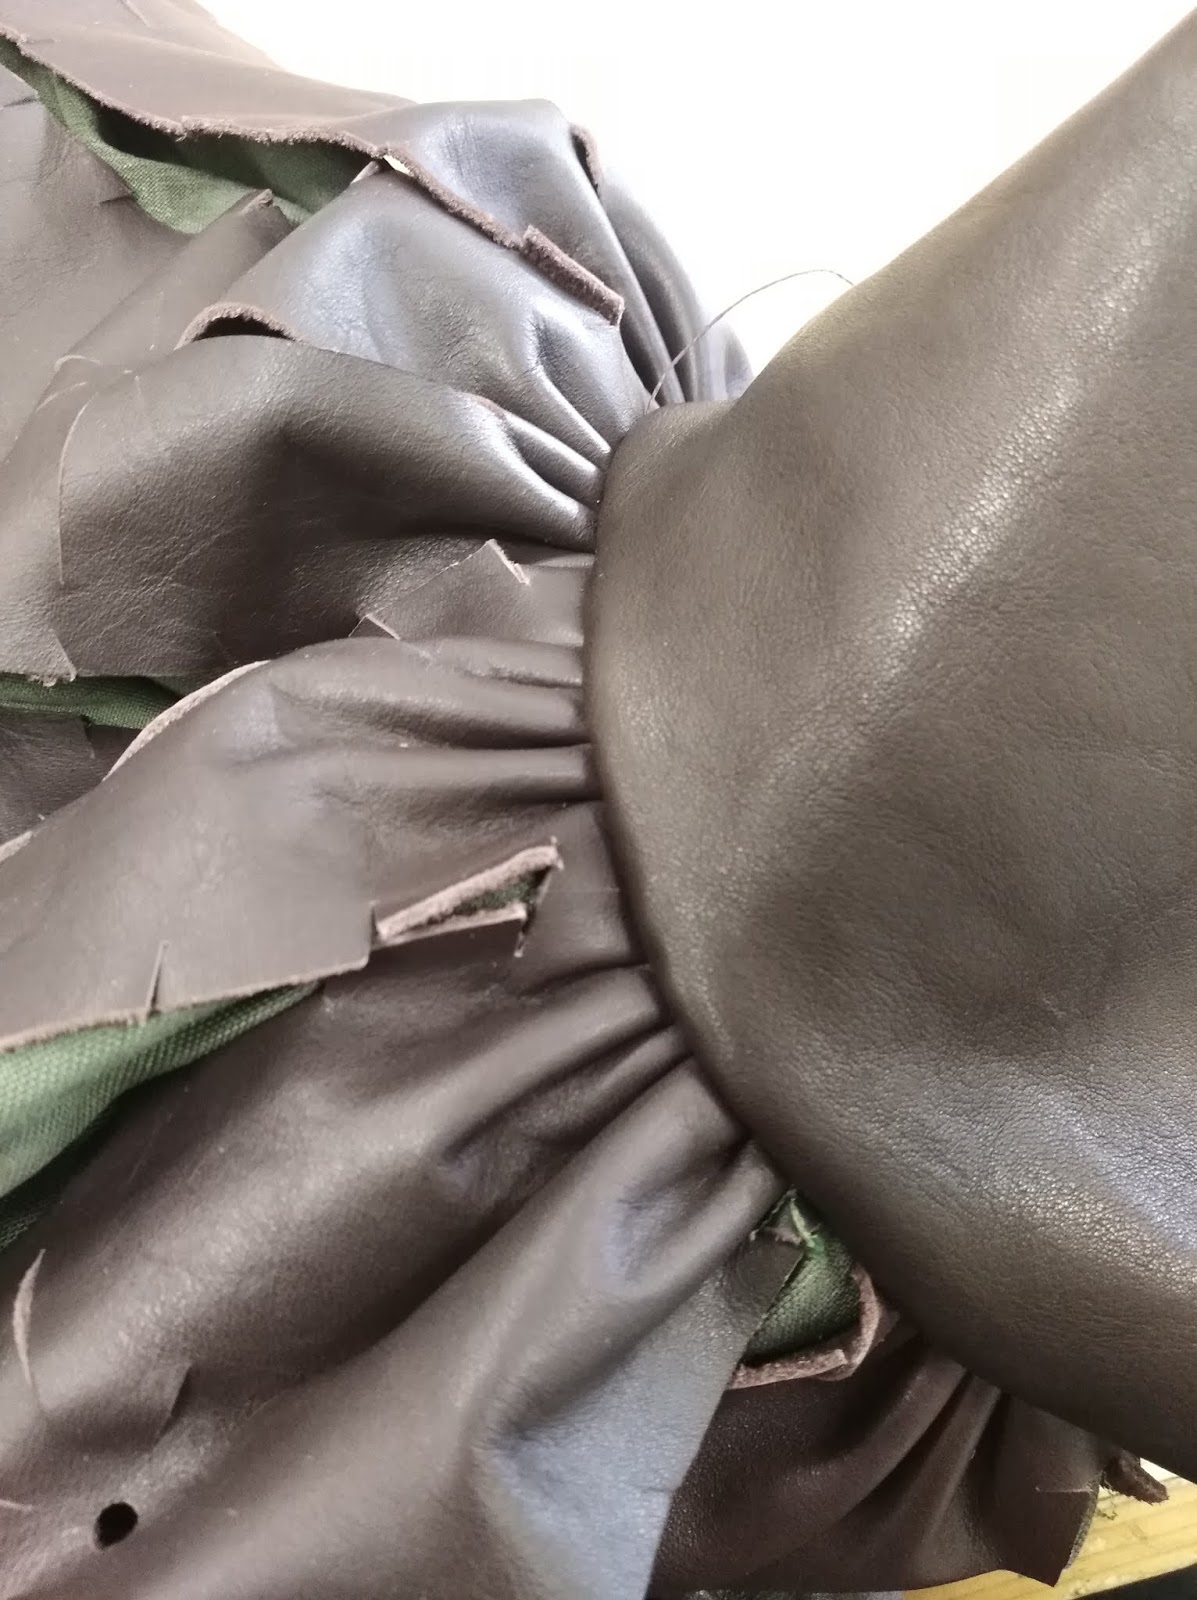
And then I discovered that I forgot to take the thickness of the pleats into account, and had to start this bit all over with cuffs about 2.5" longer. I was not pleased at all.


The poofs were sewn down to the leather by topstitching with a backstitch. I also pre-punched my stitching holes in order to make it less difficult and (much) neater.
Finally, I actually sewed the slashes together from the wrong side, just roughly cris-crossing the back to hold them shut and prevent the stuffing from working its way in there.

This photo is slightly out of order and was taken after stuffing, as apparently I didn't take photos of that step.


The backing was made fairly simply; I used my deerskin lining and roughly traced around the codpiece, and basted around the outside again.


Additionally, the portion of the codpiece which isn't being sewn into the rise had to be bound in the silk, likewise the front opening of the pluderhose. The bindings were all straight and on grain, with any excess being neatly gathered.

The seams were sewn through /all/ layers of leather and silk, then flattened open and felled down.


As you can see, I also installed the front leather placket for fencing overlap at this point. I will have to redo the velcro one of these days--it is what allows me to /not/ use an extra 10 sets of points to secure everything.

Conclusions:
Pluderhose are and always will be a bit of a pain to pattern and construct. Still, I am happier with the construction of this pair more than the previous ones, I learned a few things about working with leather as well...I had never actually made a leather garment before. Things like piping were all new to me. I had never done eyelets in leather (buttonholes, certainly), and that was interesting to do.What I would do differently next time:
Not make them in leather. Once was enough on that count! I would also probably machine sew them, although the length of actual seams on the garment is surprisingly low, and therefore not a major time sink compared to the handfinishing which is required. I would try other stuffings for the codpiece--something springy like straw or horsehair.I do like the leather base shorts, as they are buttery soft...but given the amount of labour it required and how difficult it was to handsew using glover's needles made it not really worth it for me to do again. Even if I was considering it on the 1590s trunkhose I recently started (signs of my madness for sure, but thankfully I don't have enough leather leftover).
One of the other things I would like to do differently is to not have to take shortcuts on the amount of fabric I have for the poofy lining; in each of the three pluderhose I've made, I've barely got enough width in each leg. Having more than enough of that fabric to begin with, without skimping, would be lovely.

How Historically Accurate is it:
Moderately. Pattern is accurate, as are the materials for the most part. If I were going to be extremely strict, the exterior leather is a touch modern in style--it should be alum tanned deer or elk--but I used what I had. The velcro and the plackets are obviously modern, but are extra pieces for fencing safety--they could easily be removed if desired. Stitching is all simple and correct.I would give it a 90%.
Time:
The project--not including time spent making mockup after mockup and rewriting my drafting system--took a full 78 hours and 38 minutes (approximately). The codpiece alone took about 15 hours of work, again, not including the patterning and troubleshooting.Value: I would really rather not think of it. I am fairly certain I don't have more than $150 in materials in it on the high end, which isn't bad considering the amount of time I spent on the project.
 |
| Photograph copyright Travis Abe-Thomas |
Bibliography:
Amman, Jost, Deutsch: Metzger Und Geselle Bei Der Schlachtung Eines Hausrinds, Holzstich Aus Dem Ständebuch von Jost Amman, 16. Jahrhundert., 1568, Paul Lacroix, ‘Manners, Custom and Dress During the Middle Ages and During the Renaissance Period’, available freely at Project Gutenberg <https://commons.wikimedia.org/wiki/File:The_Butcher_and_his_Servant_drawn_and_engraved_by_J_Amman_Sixteenth_Century.png> [accessed 19 September 2019]
‘An Officer of the Rank of “Oberster Feldprofoss” in the Imperial Army (Getty Museum)’, The J. Paul Getty in Los Angeles <http://www.getty.edu/art/collection/objects/274/> [accessed 19 September 2019]
Arnold, Janet, Patterns of Fashion 3, 3 (Macmillian, 1985)
Braun, Melanie, Luca Costigliolo, Susan North, Claire Thornton, and Jenny Tiramani, 17th Century Men’s Dress Patterns; 1600 - 1630 (Thames & Hudson, 2016)
‘Soldiers’, British Museum <https://www.britishmuseum.org/research/collection_online/collection_object_details.aspx?objectId=1595859&partId=1&people=107034&peoA=107034-2-60&page=1> [accessed 19 September 2019]
‘The Cathedral Museum, Uppsala’ <https://depts.washington.edu/silkroad/museums/upcath/upcath.html> [accessed 19 September 2019]
©
John Frey, 2019. The Author of this work retains full copyright for this
material. Permission is granted to make
and distribute verbatim copies of this document for non-commercial private
research or educational purposes provided the copyright notice and this
permission notice are preserved on all copies
What a nice pair of pluderhosen! Good job!
ReplyDelete