 |
| I really don't try to do these poses. And it really does help your balance--I was walking on a submerged log. |
The Project:
This was actually a fun project, and fairly quick once I got it drafted--a topcoat made of a single layer of canvas. No shaping, and little handwork beyond hemming and sewing the various facings down (and buttons, of course. Those don't count since they are a given.).What it is is a slightly rough coat made of canvas, and made to the pattern of the very early sac coats or a semi-in-between garment known as a paletot (which clearly evolved from the frock coat, and is a semi-fitted overcoat). Because it is only made of a single layer of material, and has no shaping--and isn't closely fitted--it is a quite comfortable garment for hot weather...something I rather needed.
Sources:
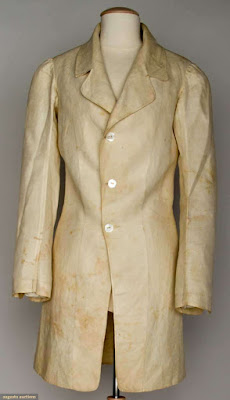
As is normal for me in my historical projects, it is primarily based on a single example, this time one sold by Augusta Auctions in 2013. They did not say exactly what the coat style was--although they did describe it just fine; they also wrongly dated it to the 1840-50s. It is described as being made of white linen. In my research in trying to figure out what to use as a pattern I went through and found that that particular pattern didn't begin to appear until the 1860s, where it was labeled as a body-sac in the drafting manual I used.This isn't a solo coat; there is another--very similar example--, plus a slightly later dated frock coat in brown linen canvas; both from Augusta Auctions (which is odd that all three examples are from the same auction page...).


Goals:
My primary goal? I wants it, and it fit nicely into the HSM Travel Challenge. Other than that, it was to give me practice in following the directions in more drafting systems--something which is quite tricky. Before I even laid out my fabric, I spent a day rewriting the instructions--even then, I barely understood parts. They weren't exactly clear. Another goal was to practice making body coat type garments; even though this is looser than a frock coat, and doesn't have the full waist seam, the cut is much the same. It also enabled me to practice collars--this is the cleanest collar and revers I've yet sewn.I was not using it to practice my historical sewing techniques, although for once it's a garment which may have been machine sewn originally.
Again, I chose this garment mainly because it caught my eye, as a summer weight and looser coat option--I do love my long coats, and rarely appear in town without one. Which honestly, it kinda sucks to be wearing closely fitted wool in hot weather (I can do it, but that doesn't mean it's pleasant). In addition, I needed something relatively straight forwarded and gratifying to make for this challenge, since I was working on one or two much more complicated projects at the same time.
Pattern:
After going through several assorted cutter's guides from the 1840s-60s, I finally decided on Acton's Improved System of Actual Measurement. Published in 1867, it wasn't as early as I liked, but it had relatively clear instructions (so I thought), was a direct measure system, and most importantly had the right garment (or something close, at least). The system is interesting because he uses a strange, strap-like device to take the measurements; I had to approximate with a measuring tape, which gave a few issues. If I intended to use the system more I would consider making one of the measuring devices.
Sleeves are standard two-piece, although narrower than standard for the 1860s; I should mention that the section on drafting sleeves made no sense. I gave it my best shot, but in the end ended up removing so much of them that it would have been easier to use another system to get the right hang (the cause of the vertical/diagonal wrinkles you see at the shoulder).
Something I decided to add which was not specified in the original garment were a pair of plait pockets--the large pockets hidden in the pleat of the back skirt. I refused to go without them, and they are quite common in (American) Civil War era frock coats.
Materials:
The original is supposed to be linen canvas; that is probably correct, but the source /is/ an auction house I've caught mistakes in before (see my first Featured Garment article). Looking closely, the material is remarkably even...but does still have the slubs indicative of linen. Regardless, I did search around for a linen canvas--primarily looking at swatches from Wm. Booth--but in the end decided to go with cotton duck. The choice was made partly for financial reasons, and partly because I really don't see much of a difference between the cotton duck and looking closely at the extant garment. In the end, I made it entirely from stash materials.For the most part, frock coats (and other body type coats) were wool, with a number of linen examples. Cotton is not common at all, but there are an example or two. The one example I could find easily is in the LACMA Museum, from the 1840s, and is of a pattern woven cotton; unfortunately, I cannot find the accession page
Mother of pearl buttons also appear on the original. Sadly, I couldn't find any that I liked locally, so decided on self-fabric covered buttons. Probably for the best--the mother-of-pearl would have been far more fragile.
Seams:
Machine. It's that simple--I didn't want to handsew the entire thing, since it just wasn't worth it to me for this garment. Hems and facings were done with white linen thread and a hemstitch. Buttonholes and button shanks were also sewn with linen thread, heavier than the other. If and when I decide to add an outbreast pocket, it will be a patch pocket, as in the secondary example of the style.Linen threads were chosen because I felt it would be the best match for the canvas in both colour and texture.
Drafting:
Eventually--once I get it cleaned up--I will publish the drafting instructions I wrote down and followed. There were a couple of issues with the method--the primary one was that I didn't have nor use the device which was specified to measure in that system. It took three drafting attempts to get it right--the first was terrible because I attempted to measure myself (I really should know better than to attempt it). The second went much better, although the sidebody ended up being too long (and the usual need to take some off the outside edge of the front shoulder seam). As I said before, the sleeve pattern was seriously problematic.

Construction:


For the first time, I did things somewhat properly, sewing the topcollar to the front facings to get a smooth seam (up until now I've usually just turned the edges under and sewn it by hand); sewing and turning the length of the collar fall and revers as a single seam to give a cleaner finish.


What I learned:
A fair amount, actually--the question is whether I can recall what. The main thing, of course, was the experience of using a new drafting system, but I also made improvements on making collars. I also found--and this is rather odd--that the collar and lapels appear neater /without/ the pad-stitching to shape them. I also found I really, really, suck at sewing post 16th century buttonholes.The main thing I would do differently--other than the body of the coat still ending slightly too long in the back (easy fix in the future)--would be to practice buttonholes beforehand. I also would have liked to do a touch of embroidery on the covered buttons.
I may also still make it water resistant with a formula out of Henley's (20th century book of trade secrets and formulas. If you don't have a copy, you should--so many cool things).

How Accurate is it:
Well, the fabric is...ok. I would have preferred a linen canvas, but I feel the cotton is acceptable for my reasons. It is machine sewn, but the original garment may actually have been as well--I can't quite tell. The pattern is correct of course, since it is from a drafting book from the same time. Obviously, the use of plastic buttons for the foundation of the covered buttons is wrong--they should have been wood or bone blanks; I don't think a difference can be seen when even with close examination of the buttons (and the plastic has the bonus of being machine washable).Because there are some slight details--the poorness of the buttonholes, namely--that are off, I will give it a nice, round, 88%.
Challenge #6: Travel.
What the item is: Sailor's Canvas Body-sac coatThe Challenge: Other than it having been supposedly a sailor's garment--and nobody really travels more than a professional sailor--it could also be considered a form of duster to protect your nicer frock coat from the dust of travel. And yes, I intentionally left this example out of my inspiration post ;)
Fabric/Materials: Cotton Duck canvas.
Pattern: Acton's Improved System, 1867.
Year: 1860s
Notions: 6 plastic buttons from my collection (pulled off of blazers from the Franken-frock project). Two weights of linen thread. "Natural" cotton machine thread.
How historically accurate is it?: I would say just under 90%. See the blog for why.
Hours to complete: 13 hours, 41 minutes. I finished it very early in the morning on the 4th of July--only a couple days late.
First worn: Not yet, really. Keeping it clean and white for the photos, and it's been raining.
Total cost: Mmm.... I think I paid 6.99 a yard for the canvas, and used about 2.5 yards. Figure $20 US.
© John Frey, 2016. The Author of this work retains full copyright for this material. Permission is granted to make and distribute verbatim copies of this document for non-commercial private research or educational purposes provided the copyright notice and this permission notice are preserved on all copies. Photographs of my work may not be duplicated.
That is a nice coat! I don't think I'd ever seen either of those extant ones before.
ReplyDeleteThank you.
ReplyDeletePinterest is your friend....with the caveat of always checking sources. I did find the third, similar coat (tucked away on my computer, no less), and will update the documentation to include it momentarily.