
Sources:
My primary--indeed, my only true reference--is Patterns of Fashion 3, by Janet Arnold. For the most part, this is pictorial based project; even Patterns of Fashion 3 (henceforth PoF) wasn't used for more than to note the shapes of doublet pieces from this period. My primary inspiration (if not for the doublet specifically) for the outfit is the above drawing from Kostüme der Männer und Frauen in Augsburg und Nürnberg, Deutschland, Europa, Orient und Afrika (23v), supposedly labeled as being of a "Man from Brunswick". This book is one of the few "travel guides" from period, which show what the fashions look like in other regions.
 |
 |
| Traced sketch of the Erik Sture doublet, from PoF. |
Who:
In period, it is unlikely a garment like this would have been worn by the maker--he would have been wearing similar clothing in fit and construction, true, but not of such "fancy" fabrics. Most likely, that is--there are accounts of tailors stealing fabric from their customers (I.e. asking for 4 yards of velvet for a doublet, when it only required a scant 3), and I suppose it's possible said fabrics could have been used for personal garments but it's more likely the material was sold on the side [Wage]. The maker of a "bespoke" doublet such as this would have been a professional tailor, most likely a member the local guild. It would have been purchased and worn by a member of the court. |
| My tools for the drafting system. |
My Goals:
I had two primary goals when I undertook this project. The first--and most complicated--was to make it as a test garment for my burgeoning numberless doublet system (designed for this style). Right now, the system has not been tested enough for publishing--if you are interested in being a beta tester, please let me know. I will discuss the system more in the section on how I drafted the pattern, but suffice it to say that it is a plausibly period, direct measure system of my own devising. |
| Back of the doublet interlining, after padstitching. You can see the lines I followed on the right; about one handspan to the outside of the armscye, it follows that. |
I am not attempting to make a garment as close to 100% period as I can. I did take shortcuts by using a machine for the internal seams--someday I may do it right, but not unless I also have the correct materials.
 |
| Svante, Nils, and Erik Stures. 1568. Uppsala Cathedral Museum, Sweden. |
Garment Description:
The 3rd quarter 16th century German doublets were a closely fitted upper body garment. As a rule (not a general rule...a solid, and unyielding rule) they had long sleeves, which were also fitted fairly close. Short skirts matching the decoration of the body were sewn at the waist of the doublet, which was invariably at the natural waist (some slight exceptions made for men with large guts, which the doublet would cover completely). There would also be a closely fitted and fairly stiff collar. Not a particularly complicated garment (which means that it's tricky to fit right). |
| 1575 Meister der Vohenstrauß-Bildnisse - Friedrich von Zweibrücken-Veldenz-Parkstein |
Materials:
Here is where I am being forced to cheat. The the primary and secondary sources--extant garments and paintings--I am basing the style on are all upper class garments (as is this), and are made of silks and velvets (actually, also made of silk, now that I think of it. The pile at least.). The stripes are all sewn on braid (also mostly silk). And there I fail--I used a synthetic material, a voided and striped velvet due to finances and availability. However! I do feel that the use of a voided velvet for my pattern is acceptable; voided velvets did exist, and there is even a horizontally striped velvet used in a pair of Venetians. |
| Page 86, PoF |
 |
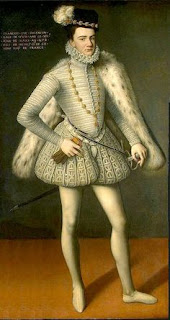
| Portret van een ridder in de orde van Calatrava, vermoedelijk van het geslacht Sorias of Sorea. (Knight of Calatrava). Frans Pourbus the Elder. |

The buttons are, again, problematic. As a rule, thread wrapped buttons were done over a wooden mold. I had issues finding small wooden beads to use as my base...so I ended up making woolen cloth buttons of the needed size, and covering those. I can at least say that the technique of making self stuffed buttons was possibly still in use in the 16th century [Henshall, pp. 122], even if it was decidedly low class. The thread for covering (same as I used for the buttonholes) was DMC cotton floss rather than--once again--silk (or even metal wrapped thread) [PoF, Page 29. Figure 194].
Drafting the Pattern:
Now for the fun part...drafting. This project began as part of a series to test my drafting (first the pluderhose...) and instructing to draft, and is the first doublet made with the numberless drafting system I am developing. Unfortunately, it's still in the testing stages, so you can't see it yet...but I'll give a sneak peak.The system being used is a direct measure system; there are no proportions, and only a few divisions--those requiring the tricky task of folding the tape in half--, where you mark the measures taken directly on a cloth tape. Therefore, there are no numbers to keep track of, no subtraction to do, just a strip of cloth being moved around in a specific manner (ok...there's more to it than that, but it's still not difficult). To the best of my knowledge, there isn't anything out there of this style of drafting, for this particular garment; I did base it on some drafting systems of the 19th century, of course.
All in all, the system isn't that unusual in how you put it together, other than the methods of finding the shoulder slope and front length.
 |
| Finding the slope of the shoulder |
Pattern:
The pattern of the garment isn't that complicated, only a few pieces, really. The back is cut on the fold, and has a grown-on collar (grown-on meaning that it is cut in one piece, rather than being sewn); the front is two pieces, with the collar cut-on. Each sleeve is in one piece, with a 's' curve sleevehead. The skirt, on the other hand, is made up of three curved pieces, with the seams matching those of the doublet body. |
| Somewhat funky shaped sleeve. I have narrow biceps, and pointy elbows--hence why it widens at that point. |

Seams:
Well, let's be honest: The construction seams were sewn by machine, partly to cut time, and partly because I do plan to fight in this garment; plus, I don't feel that handsewing a basic seam has any advantages over machine stitching, nor teaches me anything. Even so, there is a /lot/ of handwork in this piece. The breast and back interlinings are both covered in padstitching, and all visible stitching--inside and out--was hand sewn.So, let's start with the padstitching. We do know the stitch was known and used for basic shaping in the 1570s--the doublet of Nils Sture is noted to have pad stitching stiffening the neck [page 68. PoF]. Using it elsewhere in the garment at this time is more tricky--to the best of my knowledge, I'm not seeing anything positively documenting it in 1570s Germanic style doublets (as opposed to the peascods elsewhere). The earliest I have positive proof is 1600 to quilt a padded doublet [Pof, page 74], or 1615 for a possible shaped interlining [PoF, Page 26, figure 175]. I chose to use it (and the whole shaped interlining) as a way to practice the technique in regards to fitting a doublet; I am not yet sure if it worked, or not.


A fine stab stitch was used around the cuff, to flatten the edge.
Construction:
Now for the longer part! After drafting my toile, I did something unusual for me--I built the doublet from the inside out, cutting the lining first (with decent inlays on the sides, shoulders, and front edge). The lining was used as my pattern for the interlinings and fashion shell.But first, I went over every stitching line with tailor's tacks--a row of loose basting stitches, snipped between each stitch, and between the layers of fabric. They served to mark and transfer where the seams go on both layers simultaneously.

The brown wool padding goes where I planned to padstitch and shape the canvassing, and is based on the work of Mathew Gnagy, author of the Modern Maker--I have not yet purchased the book, but follow his work on Facebook.
The wool padding goes to the inside for a reason; because it's slightly fluffy, the wool compresses better than the canvas. Likewise, the canvas to the outside helps give a smoother surface for the shell.

You can see that the back scye has more or less vertical lines of stitching following it to curve around the side of shoulder and shoulder blade, which is why the shaping is vertical for about half the width of the shoulder section. Right between the blades and especially the grown-on collar also needed to be vertical in order to stiffen that section. But at that point, I began following the bottom edge of the canvas in a single line of stitches, like an obtuse, curvy, L. This line was followed to curve around the back and blade.


At this point, all the padstitching of the body is done, laid out, and temporarily basted to the lining. While the interlining is not connected to the lining in the garment, I wanted to check the fit and see how much I would have to add to my measurements when cutting/sewing the shell.


Once the interlinings were in place, I basted the side and shoulder seams to double check the fit, then sewed them more permanently.


I used a cross stitch to flatten the seam allowances of the sides, shoulders, and collar--really, I'm not sure how well I can document the stitch for that use in this period; the one image in PoF of doublet seams shows them simply overcast. Regardless, I chose this stitch for neatness and security.

The sleeves were sewn in simply, with a basic turned lining at the cuff. Naturally, I basted the sleevehead in place before machine sewing it. There was a rather tricky bit, here, trying to figure out how the linings interacted. With a little advice from the Elizabethan costuming group, I ended up sewing the body lining in one with the sleeve shell, and hand felling the sleeve lining over the seam. I figured that this would create the neatest finish.

The skirts are interlined with a layer of the canvas to give them some body, as well as the same red linen lining as the body. They got straight sewn on by machine (yes, with basting...).
 |
| The only photo you will see of it being worn, until the outfit debut. |
The cuffs are slit up the seam--there is no overlap--for about two inches (two gold lines, plus one red), to be buttoned. I finished those edges by turning the shell and lining to the inside and using the felling stitch.

After making them, I found out that even though this style is the most commonly seen made by re-enactors....there is no documentation for the pattern. Nobody has yet found a primary or secondary (painting) example of fully covered rib out thread wrapped buttons--rather frustrating, really...I had assumed that since all the tutorials taught them, that they were legit. Don't assume and back document, folks!

The way I made them can be found in the photo tutorial I wrote on my process. I'm happy to say that the post has been extremely, and surprisingly popular.


The sixteen eyelets were marked out by matching them with the pluderhose waistband, and awling the holes. As is my preference, I used a whipstitch, rather than a buttonhole stitch--if you look at extant examples, both styles are seen.
The buttons were sewn normally, with a moderately long thread shank, wrapped with half-hitches to stiffen.
What I learned:
I will try to go in order for this: To start with, I designed and learned an entirely new drafting system, of which this doublet is the first result. The most difficult part of this was figuring out how to get the ease into the measurements. In doing do, I was studying a variety of later systems, and noting the characteristics of doublet shapes from this period.For the padstitching, while the technique is quite familiar to me, I did learn a few things about using it; namely the importance of working from the inside to the outside, in order to avoid bubbles; and that the fewer layers you may be using, the more tension you need. A fair amount of searching was also required to decide on shape of the interlinings. I also learned a bit about how the interlining is meant to move with and curve around the body. Another thing was the mistake I made by not giving extra width in the canvassing--remember that it shrinks with the padstitching.
Finally, I should look into pressing the canvassing after working--that is a potential step I learned from watching modern bespoke tailor Rory Duffy's videos tonight, while writing this. The link is to his general youtube page. I particularly recommend his stitch tutorials. Up until now, I've been gentle in not pressing my padstitched pieces at all.
Buttons! I had never made the Elizabethan thread wrapped buttons before this project, and rather enjoyed doing so--they are kinda relaxing. So that is another entirely new technique for this project. I do intend to learn other styles--either the "turk's head" or "spiderweb" for the planned jerkin to be worn over this.
That I was doing the bar tacks on the ends of the buttons wrong. I simply ran a line of buttonhole stitches, with the perl to the outside. Instead, I should have whipped a few parallel lines of thread just outside the buttonhole, then wrapped the buttonhole stitch around those, with the perl towards the inside.
What I would do differently:
Well, other than the errors on the buttons and buttonholes, I would conduct the pad stitching slightly differently, to shape it better, and cut the interlining extra large (especially around the armscye, and neckline--I had to piece the canvas and lining there). I will also look into pressing the interlining--but will test on a small piece first. The other major thing I would change is how I sew the skirt on--I really need to find a much neater way.I also really, really, want a set of buttonhole chisels for cutting buttonholes. Even if they are just cheap woodworking chisels rather than reproductions, I'm sick of ending up with jagged buttonholes because I used scissors.
How Historically Accurate did the project turn out:
Do I have to answer this? I really don't want to...which should be your clue. In appearance it is fairly good. Obviously, the fabric of the shell is wrong, since it's a synthetic. The rest of the materials are fine, other than the substitutions of cotton thread for silk.Other than the machine sewing (all on straight stitched seams) the construction is okay as well...to the best of my knowledge. There really needs to be a doublet of this style/period deconstructed and have every little detail of the construction noted and photographed (and not locked behind an academic paywall)...it would be incredibly helpful.
I think the real question when deciding how historically accurate something is, is whether somebody from that period would look askance at it. I would say...maybe. Quite probably in fact, as they look closer. So...maybe 65%.
Time:
All in all--and not including fittings--the project took 49 hours. A full 7.5 of those were just covering the buttons (not making the bases). I think in the future I will try to break the stages down better.Cost for materials was maybe $40--I don't keep track as well as I should. Given the time and average current tailor's wage, that makes it around a $725 (US dollar) garment (theoretically. I wish, anyways).
Bibliography:
Unknown. A Tailor's Wage. (Blog post, 11-2-2013) http://www.elizabethancostume.net/blog/a-tailors-wage/. [Accessed. 8-1-16]
Carlson, Jennifer L.. Sewing Stitches Used in Medieval Clothing.http://www.personal.utulsa.edu/~marc-carlson/cloth/stitches.htm. [Accessed 8-1-16]
Henshall, Audrey S., Seaby, Wilfred A. The Dungiven Costume. Ulster Journal of Archaeology, Third Series, Vol. 24/25 (1961/1962), pp. 119-142 (Ulser Archaeological Society, 1962). [PDF, Accessed 7-20-2012)
Frey, John. Brann's Plain and Patented Self-Graduated Measure System for Cutting Men's Doublets. OR, How to Draft a Doublet with a Ribbon. (Blog post, not yet published).
Frey, John. Buttonholes Through the Periods. http://matsukazesewing.blogspot.com/2015/07/buttonholes-through-periods.html. [Accessed 7-15-16]
HSM Information:
Challenge #8: Pattern.What the item is: A men's doublet, 3rd quarter of the 16th century.
The Challenge: Well--you wanted bold patterns, right? It occasionally made my eyes hurt when working on it. Conveniently, the piece I was inspired by is in the Pattern Inspiration post ;)
Fabric/Materials: Fully discussed in the blog post, but fashion fabric is synthetic, interlinings are wool and cotton canvas, and lining is linen.
Pattern: My own, experimental, doublet drafting system.
Year: 1570s Germany
Notions: Something like 5-6 types of thread.
How historically accurate is it?: Again, fully discussed in the blog post. But to be short, I would say around 65%, because of the materials, the fit is slightly off, and I machine sewed the main construction seams.
Hours to complete: 49. The project was started at the beginning of June.
First worn: Not yet. Like the pluderhose (my Holes challenge entry) it goes with, the first wearing and debut won't be until I finish the full project.
Total cost: Something like $40 US? I didn't keep track as well as I should.
© John Frey, 2016. The Author of this work retains full copyright for this material. Permission is granted to make and distribute verbatim copies of this document for non-commercial private research or educational purposes provided the copyright notice and this permission notice are preserved on all copies. Photographs of my work may not be duplicated.
No comments:
Post a Comment